こんにちは、AIShift バックエンドエンジニアの石井(@sugar235711)です。
AIShiftでは去年の11月からAI Workerという新しいサービスの開発が始まりました。(以下AI Worker)
本格的に開発が始まり3ヶ月弱経ったので、その間に試してきた技術やチームの取り組みについてまとめてみたいと思います。
はじめに
この記事では、AI Workerのおおまかな概要・設計を説明し、それらのバックエンドを実現する上でどのような技術を試してきたのか、技術以外でのチームの取り組みについてまとめます。
少し分量が多いので、ライブラリについての情報を求めている方は、目次から気になる部分を読んでいただければと思います。
何を作っているのか
ざっくりまとめると、Microsoft Teams/Web上で動くAIを活用した業務改善プラットフォームを作成しています。
GPTとRAGを組み合わせた社内情報検索等、様々な汎用的なタスクを使用できるアプリケーションを開発しています。

全体のアーキテクチャ
AI Workerは現状本番リリースに向けて開発を進めています。
- RAGを組み合わせたChatGPT Likeのチャットシステム(Streamを扱う)
- Entra IDを活用したログイン機能
- ユーザーの権限に応じた機能へのアクセス制御
- 様々なタスクアプリの開発
特にチャットサービスの肝となるGPTはAzure OpenAIを使用し、AIチームと共同で開発を行っています。
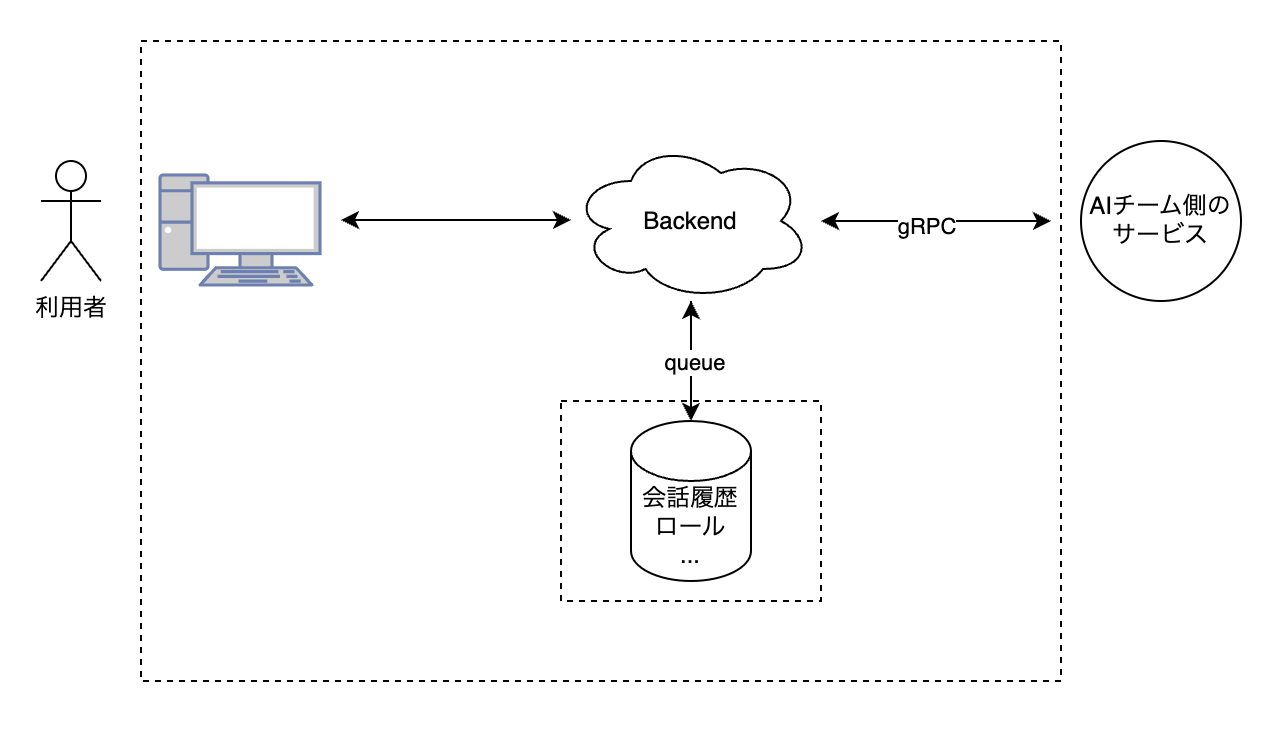
この記事では、AIチーム側が開発しているサービス(以下、AIチーム側のサービス)と、フロントエンドの中間に位置する「バックエンドの開発」に焦点を当てて説明していきます。
AI Workerのバックエンド
AI Workerのバックエンドは、主に以下の責務を担っています。
- テナント情報の管理
- ユーザーの認証・認可
- ユーザーの権限に応じた機能へのアクセス制御
- 履歴・設定値の管理
- AIチーム側のサービスへの中継
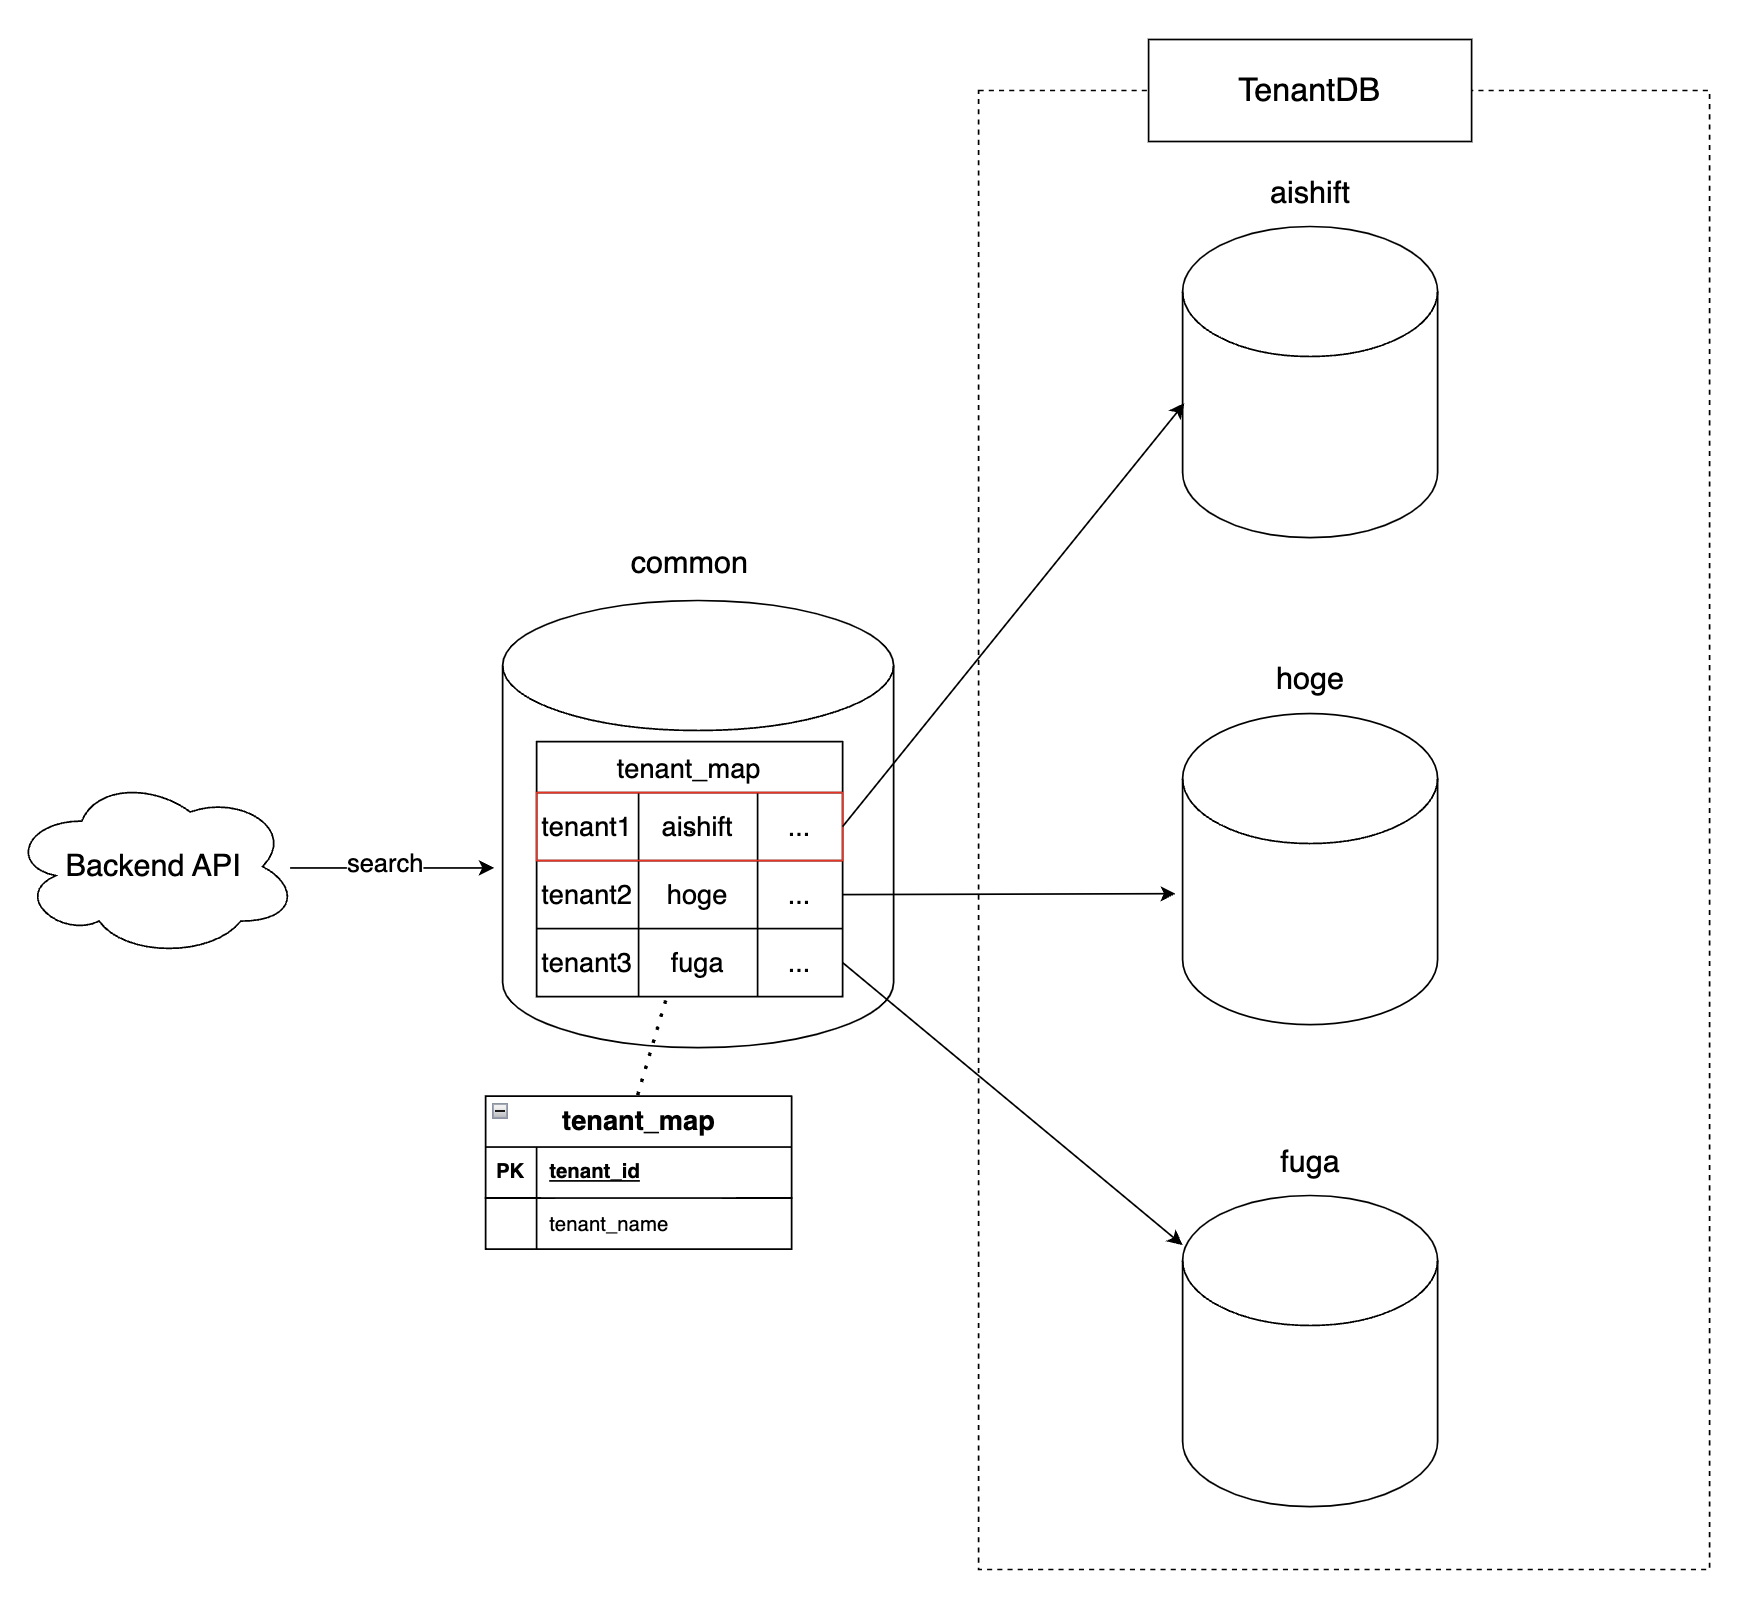
複数企業様に使用していただくSaaSの形式のため、必然的にマルチテナントに耐えうる形でアプリケーションの設計を行うなう必要があります。
マルチテナントのデータの管理体系に関しては、ブリッジモデルを採用し、各テナントごとにデータベースを分離しています。
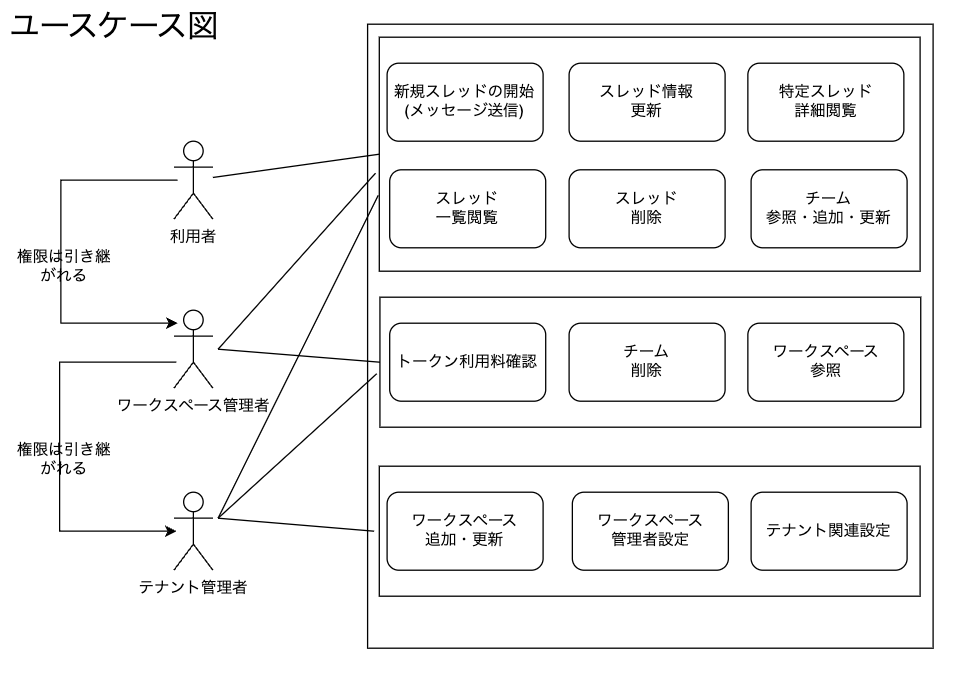
さらにテナントの中にワークスペース、チームという概念を設けて、その管理者に対してロールを割り当てることで、各リソースに対する階層構造のアクセス制御(RBAC)を実現しています。
どのような技術を試しているのか
さて、ここまででAI Workerのバックエンドがどのような機能を持っているのか、どのようなアーキテクチャになっているのかの概要を説明しました。
次に上記の機能群を実現するために、どのような技術を試してきたのかをまとめてみたいと思います。
技術選定の背景
前提として、AI Workerの開発チームは当初PM: 1/デザイン兼フロントエンド: 1/バックエンド1の計3人で構成されており、バックエンドの技術選定は以下のような条件下で行われました。
- メンバーのスキルセットがフロントエンドに寄っている
- 最小限の機能を早くリリースしたい
- コストを可能な限り抑えたい
そのため、メンバーが慣れていてかつ、オールインワンのライブラリが多く、可能な限り楽して開発を進められそうなTypeScriptで開発することを決定しました。
また当初はAI関連のサービスとの相性が良いCloudflare Workersをベースに開発を進める予定だったので、それに合わせた技術選定を行いました。
採用した技術
3ヶ月経った現在、ビジネス的な都合もありCloudflareではなくAzure上でアプリケーションを構成しています。
しかし、インフラ面以外の構成は大きく変更しておらず、以下のようなライブラリ・ツールを使用して開発を進めています。
- Bun(Runtime, Test Runner)
- Hono(Webフレームワーク)
- Drizzle(クエリビルダー)
- MSAL(認証・認可)
- Casbin(RBAC)
- Hygen(Code Generator)
- DevCycle(Feature Flag)
- Biome(Linter/Formatter)
インフラはAzure Container AppsとPostgreSQLを使用し、TerraformでIaC化を行っています。
- Azure Container Apps
- PostgreSQL
- Terraform
本記事では詳しくは触れませんが、Azure上でのアプリケーション構成については以下の記事でまとめています。
https://zenn.dev/aishift/articles/881504222e1e85
IaC化やインフラ面での課題や取り組みについては別途まとめる予定です。
採用してみて良かったこと・困ったこと
AI WorkerではTypeScriptを中心としたライブラリを採用し、開発を進めてきました。
それぞれのライブラリを採用してみて良かったこと、困ったことをまとめます。
Bun、Honoに関してはLTをした際のスライドも公開していますので、興味がある方はこちらもご覧ください。
https://speakerdeck.com/sugarcat7/xin-gui-sabisuno-batukuendokai-fa-debunxhonowoshi-ishi-mete-2keyue-jing-tutahua
Bun(Runtime, Test Runner)
BunはJavaScript Runtime, Bundler, Test Runner...等を同包したAll-in-Oneのツールです。
AI Workerでは、主にRuntime、TestRunner、Package Managerの機能を使用しています。
良かったこと
Workspaceの使い心地/ローカルでの開発体験が良い
AI Workerでは、モノレポ上でProjectを構成しており、BunのWorkspace機能を使用して、フロントエンドとバックエンドを一つのプロジェクトとして管理しています。
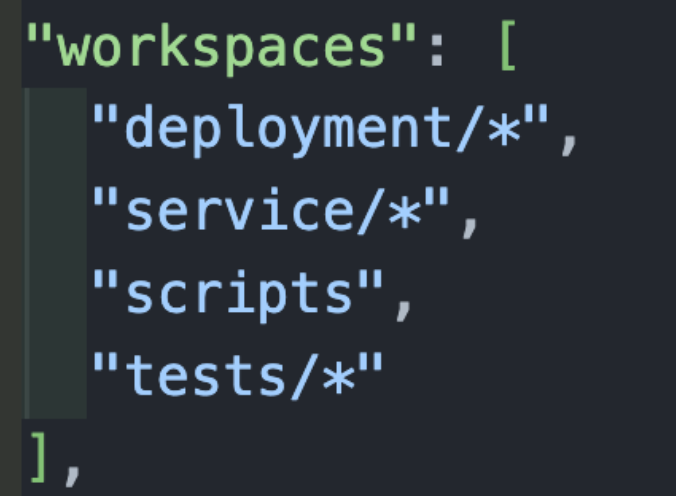
大体プロジェクトが肥大化してくると、ワークスペースで管理していると1回のpackageのインストールやビルドに時間がかかってくるものですが、今のところinstallも10秒前後(npmの場合2分)で済んでおり、非常に開発体験が良いです。

Bun Shell等の組み込み機能やドキュメントが豊富
v1.0.24で追加されたBun Shellによってクロスプラットフォームで動くシェルスクリプトを簡単に書くことができます。
AI WorkerではCI/CDで使用するスクリプトをTypeScriptとzxを使用して管理していましたが、Bunネイティブの機能を使用して置き換えることができました。
https://bun.sh/blog/bun-v1.0.24
また、ContainerでBunを使用する際のDockerfileの構成も公式が提供しているため、環境のセットアップも簡単に行うことができました。
https://bun.sh/guides/ecosystem/docker
困ったこと
Lifecycle scriptsが無効化されている
Bun v1.0.16まではセキュリティ上の理由でデフォルトで全てのライブラリのLifecycle scriptsが無効化されていました(protobufjsなどのpostinstallでエラー発生)
そのため、ホワイトリストに対してパッケージを手書きしてあげる必要がありました。
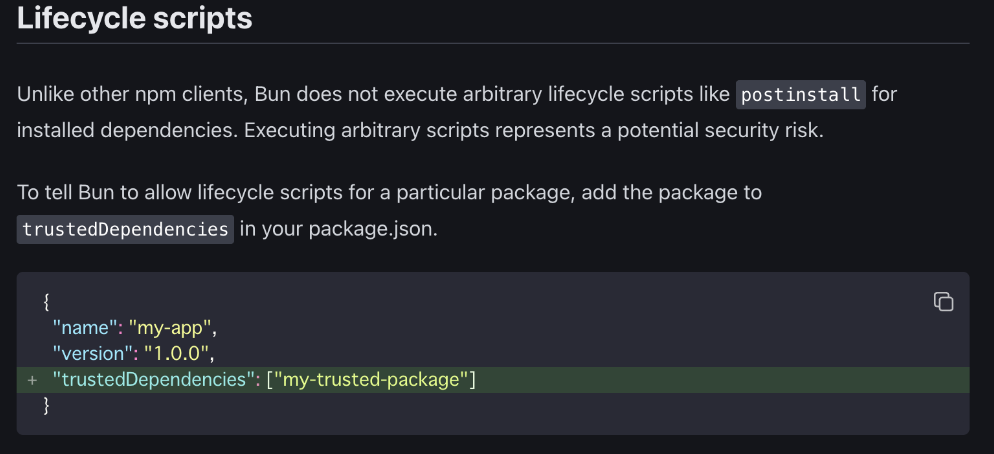
v1.0.17でTop500のパッケージはホワイトリスト化される修正が入ったため、今のところ大きな問題にはならずに使えています。
https://bun.sh/blog/bun-v1.0.17#bun-install-now-runs-lifecycle-scripts-for-the-top-500-npm-packages
lockbファイルの扱い
bun installを行うとbun.lockbというバイナリファイルが生成されます。
バイナリのままだとlockfileの差分確認が難しいです。
公式ではyarn.lockも吐き出す設定をしてdiffを取るのを推奨しているそうですhttps://bun.sh/docs/install/lockfile
中身を見るという観点だけで言えば、有志で開発されているextentionがあるので、これを使うと直接lockbファイルを見ることができます。(diffは確認できません)
https://marketplace.visualstudio.com/items?itemName=jaaxxx.bun-lockb
Hono(Webフレームワーク)
最近話題のWebフレームワークです。
Expressの後継と言われており、Web標準に従った実装と軽量で高速が売りのAll-in-Oneのフレームワークです。
AI Workerでは、HonoとThirdPartyの@hono/zod-openapiを使用し、OpenAPIをベースとしたスキーマ駆動開発を行っています。
良かったこと
スキーマ駆動での開発がしやすい
@hono/zod-openapiを使用するとzodのスキーマからAPIのRouterを生成することができます。
コード例
// zod
import { z } from '@hono/zod-openapi'
import { createRoute } from '@hono/zod-openapi'
import { OpenAPIHono } from '@hono/zod-openapi'

const ParamsSchema = z.object({
  id: z
    .string()
    .min(3)
    .openapi({
      param: {
        name: 'id',
        in: 'path',
      },
      example: '1212121',
    }),
})

const UserSchema = z
  .object({
    id: z.string().openapi({
      example: '123',
    }),
    name: z.string().openapi({
      example: 'John Doe',
    }),
    age: z.number().openapi({
      example: 42,
    }),
  })
  .openapi('User')

const route = createRoute({
  method: 'get',
  path: '/users/{id}',
  request: {
    params: ParamsSchema,
  },
  responses: {
    200: {
      content: {
        'application/json': {
          schema: UserSchema,
        },
      },
      description: 'Retrieve the user',
    },
  },
})

// entry point
const app = new OpenAPIHono()

app.openapi(route, (c) => {
  const { id } = c.req.valid('param')
  return c.json({
    id,
    age: 20,
    name: 'Ultra-man',
  })
})

// The OpenAPI documentation will be available at /doc
app.doc('/doc', {
  openapi: '3.0.0',
  info: {
    version: '1.0.0',
    title: 'My API',
  },
})
https://hono.dev/snippets/zod-openapi
さらに@hono/swagger-uiを組み合わせると、SwaggerUIを生成することもできます。
app.get('/ui', swaggerUI({ url: '/doc' }))
https://hono.dev/snippets/swagger-ui
※OpenAPIの仕様書自体をファイルに出力する機能はないため、yaml等の形式でOpenAPIの仕様書の形式が欲しい場合は別途出力が必要です。AI Workerではこれらの機能を利用し、各router内でスキーマを定義し、最終的にEntry Pointに集約させてAPIの実装を行っています。
./service/api/routes
├── index.ts
├── message.ts
├── rag.ts
├── team.ts
├── tenant.ts
├── thread.ts
├── user.ts
└── workspace.ts
...
- handlerを各routeから呼び出す
// routes/thread.ts
const threadApi = new OpenAPIHono()

const threadInjector = new ThreadInjector()

threadApi.openapi(listThreadsRoute, (c) => threadInjector.threadHandler.list(c))
threadApi.openapi(getThreadRoute, (c) => threadInjector.threadHandler.get(c))
threadApi.openapi(updateThreadRoute, (c) => threadInjector.threadHandler.update(c))
threadApi.openapi(deleteThreadRoute, (c) => threadInjector.threadHandler.delete(c))

export { threadApi }
- エントリーポイントでルーティングを行う。
// cmd/index.ts
const app = new OpenAPIHono()

app.use('*', logger(), cors(), jwt(), acl())

app.route('/users', userApi)
app.route('/threads', threadApi)
app.route('/messages', messageApi)

// ....
便利なHelper/Middlewareが多い
Honoには便利なHelper/Middlewareが多く用意されており、Streamを扱うのに特化したHelperやCorsやJWTを扱いやすくしてくれているMiddlewareが用意されています。
// example.ts
import { Hono } from 'hono'
import { poweredBy } from 'hono/powered-by'
import { logger } from 'hono/logger'
import { basicAuth } from 'hono/basic-auth'

const app = new Hono()

app.use('*', poweredBy())
app.use('*', logger())

app.use(
  '/auth/*',
  basicAuth({
    username: 'hono',
    password: 'acoolproject',
  })
)
また、ThirdPartyのミドルウェアも豊富で、前述のopenapi関連のミドルウェアなども充実しています。
https://hono.dev/middleware/third-party
AI WorkerではStreamを多く扱うため、HonoのStream関連の機能をよく使用しています。
例えばHonoにはSSEとしてデータを送信するstreamSSEという関数が定義されており、下記のようにストリームに対して情報を付加したり、別サービスからのstreamをフロントエンドにSSEとしてそのまま流す処理が簡単に実装できます。
// example.ts
for await (const chunk of sseStream.data) {
    const chunkStr = chunk.toString()
    const jsonObjects = chunkStr.split('data: ').filter((str: string) => str.trim())

    for (let jsonObj of jsonObjects) {
        jsonObj = jsonObj.trim().replace(/\n/g, '\\n')
        const c: ChunkContent = JSON.parse(jsonObj)
        if (!c) {
            throw new Error('No chunk')
        }
        c.hoge = hoge // <- streamに情報を付加
        stream.writeSSE({ data: JSON.stringify(c) })
    }
}
https://hono.dev/helpers/streaming
Contextが使いやすい
HonoではRequest/ResponseをContextを使ってやりとりします。
Go言語のContextと同じような使い方ができ、Middlewareでセットした値を他のMiddlewareやHandlerで取得することができます。
AI Workerでは、JWTから得たテナントID等の情報をContextにセットして、それを使ってアクセス制御を行っています。
下記はHandlerの一部実装で、tenantId: c.get('tenantId')のようにContextから値を取得しています。
// infra/http/server/thread.ts
export class ThreadHandler implements IThreadHandler {
  private threadUsecase: ThreadInteractor
  constructor(threadUsecase: ThreadInteractor) {
    this.threadUsecase = threadUsecase
  }

  async get(c: Context): Promise> {
    // ....
    const input: GetThread = {
      tenantId: c.get('tenantId'), // Contextから値を取得
    }

    const result = await this.threadUsecase.get(input)

    if (!result.isSuccess) {
      const errorResponse: ErrorResponse = {
        message: result.getError().message,
      }
      return c.json(errorResponse, result.getError().code)
    }
    return c.json(ThreadResponseSchema.parse(result.getValue()), 200)
  }
  // ...
}
クリーンアーキテクチャでの実装を行っている場合は、Contextを伝搬させることでレイヤー間での値の受け渡しを行うことができるため、実装がしやすいです。
困ったこと
JWT検証のAlgorismがHMACのみ
HonoのHelperを使用してJWTの検証を行おうと思った時に、RSAの検証が行えませんでした。
AI Workerでは認証認可にEntraIDを使用しており、APIの利用時にはEntraの公開鍵でJWTの検証を行う必要がありました。
そのため、PublicKeyを使用したVerifyに関してはAuth0等で利用されているライブラリ(jsonwebtoken/jwks-rsa)を入れて、JWTの検証を行うようにしています。
// verify.ts
import { AppError, StatusCode } from '@/core/error'
import { Result, toAsyncResult } from '@/core/result'
import { decode } from 'hono/jwt'
import { JwtPayload, verify } from 'jsonwebtoken'
import { JwksClient } from 'jwks-rsa'

/**
 *
 * Access token verification content includes:
 *  - Issuer verification: This is done by checking the issuer URL which should be https://login.microsoftonline.com/{tenantid}/v2.0
 *  - Tenant ID verification: The 'tid' from the access token payload is set to the tenantID part. We then confirm the exact match with the value embedded later and the 'iss' of the payload.
 *  - Signature verification: The signature key is obtained from https://login.microsoftonline.com/${tenantId}/discovery/v2.0/keys. We then get and verify the target public key from the 'kid' of the JWT header.
 */
const validateJwtToken = async (token: string): Promise> => {
  const { header, payload } = decode(token)
  const issuerUrl = https://login.microsoftonline.com/${payload.tid}/v2.0
  if (issuerUrl !== payload.iss) {
    return Result.fail(new AppError(StatusCode.UNAUTHORIZED, 'Invalid issuer'))
  }
  const jwksUri = https://login.microsoftonline.com/${payload.tid}/discovery/v2.0/keys
  const jwksClient = new JwksClient({ jwksUri })

  const keys = (await jwksClient.getKeys()) as any[]
  const target = keys.find((k) => k.kid === header.kid)
  if (!target) {
    return Result.fail(new AppError(StatusCode.UNAUTHORIZED, 'Invalid signature'))
  }
  const pk = -----BEGIN CERTIFICATE-----\n${target.x5c.at(0)}\n-----END CERTIFICATE-----

  return Result.ok(await verify(token, pk, { algorithms: ['RS256'] }))
}
Drizzle
Drizzle ORM/Drizzle Kit/Drizzle Studioに分かれ、クエリビルダー、マイグレーションの機構などが同包されたライブラリ群です。
https://orm.drizzle.team/docs/overview
クエリビルダーに関してはSQLライクにかけることや、テーブル定義やマイグレーションのスクリプトもTypeScriptで書くことができるのが気に入り使用しています。
良かったこと
テーブル定義がTypeScriptで書ける
Drizzleを使用することで、テーブル定義をTypeScriptで書くことができます。
MySQL, PostgreSQL, SQLiteそれぞれに対応しており、それぞれのDBMSのカラムに対応した型を使用することができます。
AI WorkerではPostgreSQLを使用しているため、PostgreSQLに対応した型を使用しています。
import { InferInsertModel, InferSelectModel, sql } from 'drizzle-orm'
import { pgTable, text, uuid } from 'drizzle-orm/pg-core'

export const UserTable = pgTable('user', {
  id: uuid('id').primaryKey(),
  name: text('name').notNull(),
  email: text('email').notNull().unique(),
})

export type User = InferSelectModel
export type InsertUser = InferInsertModel
またdrizzle-kitの機能を使用することで、DDLを自動生成することができます。
下記は自動生成されたDDLの一部で、Postgres固有のuuid型を使用したDDLが生成されるなど、各DBMSに依存したDDLを生成することができます。
CREATE TABLE IF NOT EXISTS "user" (
    "id" uuid PRIMARY KEY NOT NULL,
    "name" text NOT NULL,
    "email" text NOT NULL,
    CONSTRAINT "user_email_unique" UNIQUE("email")
);
https://orm.drizzle.team/kit-docs/overview#migration-files
さらに、生成されたDDLからマイグレーションを行うこともできます。
import { drizzle } from "drizzle-orm/postgres-js";
import { migrate } from "drizzle-orm/postgres-js/migrator";
import postgres from "postgres";
const sql = postgres("...", { max: 1 })
const db = drizzle(sql);
await migrate(db, { migrationsFolder: "drizzle" });
await sql.end();
https://orm.drizzle.team/kit-docs/overview#running-migrations
マイグレーションをdrizzle経由で行うと、drizzleDBが自動で作成され、マイグレーションの履歴が保存されます。
CREATE TABLE drizzle."__drizzle_migrations" (
    id serial4 NOT NULL,
    hash text NOT NULL,
    created_at int8 NULL,
    CONSTRAINT "__drizzle_migrations_pkey" PRIMARY KEY (id)
);
困ったこと
コネクションの管理
基本的にdrizzleはクエリビルダーなので、コネクションプールの管理は自分で行う必要があります。
AI Workerでは、AzureのContainer上からManagedのPostgresと接続するため、node-postgresのPoolを使用してコネクションプールを管理しています。
https://node-postgres.com/apis/pool
ブリッジモデルの設計上、テナントごとにDBを分け管理しているので、各テナントDBのPoolを良い感じに使い回してコネクションを管理する必要があります。
基本的にはシングルトンでDBClient Classを扱い、テナントDBごとにPoolのキャッシュを作成し使い回すようにしています。
シングルトンでキャッシュを管理するため、Mutexを使用して排他制御を行っています。
// infra/database/client.ts
export class DBContext {
  private _tx: NodePgDatabase
  constructor(tx: NodePgDatabase) {
    this._tx = tx
  }

  // Getter for the transaction
  get db() {
    return this._tx
  }
}

export class DBClient {
  private cache: Map = new CacheStore()
  private mutex = new Mutex()
  // To handle as a singleton
  private static _instance: DBClient
  static get instance() {
    if (!DBClient._instance) {
      DBClient._instance = new DBClient()
    }
    return DBClient._instance
  }
  // ....
  // Sets the database client for a specific tenant ID
  async poolClient(tenantId: string): Promise> {
    const release = await this.mutex.acquire()
    try {
      if (!this.cache.has(tenantId)) {
        const result = await this.initializeTenantPool(tenantId)
        if (!result.isSuccess) {
          return Result.fail(result.getError())
        }
      }
      const clientInfo = this.cache.get(tenantId)
      if (!clientInfo) {
        return Result.fail(
          new AppError(
            StatusCode.INTERNAL_SERVER_ERROR,
            Client for tenant ${tenantId} is not initialized
          )
        )
      }
      return Result.ok(clientInfo)
    } finally {
      release()
    }
  }
  //....
}
上記のDBClientを使用して、transactionごとにコネクションを取得し、実行後にリリースするTransactionManagerを実装しています。
connectionを定期的にリリースしないと、pool作成時に指定した最大接続数を超えてしまい、エラーが発生してしまうため、リリース処理は必須です。

https://node-postgres.com/features/pooling
// infra/database/transaction.ts
import { Result } from '@/core/result'
import { ITransactionManager } from '@/internal/domain/repository/transaction'
import { DBClient, DBContext } from './client'
export class TransactionManager implements ITransactionManager {
private client: DBClient
constructor(client: DBClient) {
this.client = client
}
async withTransaction(
tenantId: string,
operation: (context: DBContext) => Promise>
): Promise> {
const p = await this.client.poolClient(tenantId)
if (!p.isSuccess) {
return Result.fail(p.getError())
}
const poolClient = p.getValue()
const conn = await poolClient.pool.connect()
try {
const db = await poolClient.db
const res = await db.transaction(async (tx) => {
const ctx = new DBContext(tx)
const op = await operation(ctx)
if (!op.isSuccess) {
tx.rollback()
return Result.fail(op.getError())
}
return op
})
return res
} finally {
await conn.release()
}
}
}
このTransactionManagerを使用し、usecase層でトランザクションを張るようにしています。これによってテナントDBの切り替えとコネクションプールの管理を実現しています。
// usecase/thread.ts
export class UserInteractor implements IUserInteractor {
  private transactionManager: ITransactionManager
  private userRepository: IUserRepository

  constructor(
    transactionManager: ITransactionManager,
    userRepository: IUserRepository,
  ) {
    this.transactionManager = transactionManager
    this.userRepository = userRepository
  }
  // ...
  async create(input: CreateUser): Promise> {
    return this.transactionManager.withTransaction(input.tenantId, async (ctx) => {
      const user = new User(input.userId, input.name, input.email, input.role)
      const repoResult = await this.userRepository.create(ctx, user)
      return repoResult
    })
  }
}
DMLの生成をサポートしていない
DrizzleはDDLの生成をサポートしていますが、DMLの自動生成はサポートしていません。
マスタデータの投入など、DDL同様、DMLのバージョン管理はしたいところです。
一つの方法としては、drizzle-kit generate:pg --customのように--customフラグをつけることで、空のマイグレーションファイルを生成し、手動でDMLを書くことで解決できます。
https://orm.drizzle.team/kit-docs/commands
-- Custom SQL migration file, put you code below! --

-- Insert default roles
--> statement-breakpoint
CREATE EXTENSION IF NOT EXISTS "uuid-ossp";

--> statement-breakpoint
INSERT INTO "role" ("id", "name", "permissions") VALUES
(uuid_generate_v4(), 'TenantAdmin', '...');
Casbin(RBAC)
CasbinはACLやRBAC(Role Based Access Control)のようなアクセス制御モデルをサポートする認証ライブラリです。
AI Workerでは、Casbinを使用してユーザーの権限に応じたアクセス制御(RBAC)を行っています。
Casbinはモデルとポリシーを定義し、定義に基づいてアクセス制御を行うことができます。
ポリシーに関しては、csvやDBに保存することができ、AI Workerでは単純な階層構造(TenantAdmin -> WorkspaceAdmin -> Member)を定義したポリシーをcsvで管理しています。
良かったこと
モデルとポリシーの定義がしやすい
一度モデルとポリシーを定義してしまえば、それに基づいてエンドポイントごとでのアクセス制御を行うことができます。
`confファイル`に`sub: 誰が`, `obj: 何を`, `act: どうするか`を定義し、`policyファイル`にはそれに対する`許可・拒否`を定義します。[request_definition]
r = sub, obj, act
[policy_definition]
p = sub, obj, act, eft
[role_definition]
g = _, _
[policy_effect]
e = subjectPriority(p.eft) || deny
[matchers]
m = g(r.sub, p.sub) && keyMatch5(r.obj, p.obj) && (r.act == p.act || p.act == "*")
下記はcsvでのポリシーの定義例です。
TenantAdmin -> WorkspaceAdmin -> Memberの階層構造を持つポリシーを定義しています。
p, TenantAdmin, /*, *, allow

p, WorkspaceAdmin, /tenant_setting/workspaces, GET, allow
p, WorkspaceAdmin, /users , GET, allow

p, Member, /tenant_setting/workspaces, *, deny

g, Member, WorkspaceAdmin
TenantAdminは全てのリソースに対してアクセスできますが、WorkspaceAdminは /tenant_setting/workspacesと/usersにのみアクセスできるように定義しています。
また、Memberはg, Member, WorkspaceAdminでWorkspaceAdminの権限を継承しながら、/tenant_setting/workspacesにはアクセスできないように定義しています。
このように、model.confのrole_definitionの機能を使用することで、階層構造のアクセス制御を簡単に実現することができます。
困ったこと
ポリシーの管理が面倒
現状はcsvでポリシーを管理していますが、ポリシーが増えてきたり、PathValueに応じて動的にポリシーを管理する必要がある場合、csv単体の管理は難しくなってきます。
代替案としてはDBにポリシーを保存し、動的な値に対してポリシーにも対応できるようにできます。
https://casbin.org/ja/docs/policy-storage/
しかし、キャッシュ等をうまく活用しないとAPIリクエストのたびにDBへのアクセスが走ったり、Casbinに依存したDBのスキーマを管理する必要があるため、単純なポリシーの管理に関してはcsvでの管理が現状では適していると考えています。
DevCycle(Feature Flag)
DevCycleはFeature Flagを提供するサービスです。
Feature Flagは下記のように「新機能」をフラグ化し動的に管理するための仕組みです。
新機能B = true

if (新機能B == true)
  新しい機能Bを提供()
else
  古い機能Aを提供()
DevCycleには以下のような特徴があります。
50ms以下のレイテンシ: 高速なレスポンス。
SDKの豊富さ: 導入が容易。
料金体型: MAU課金ですが、価格面で良心的な料金。
使いやすさ: DX・UXが直感的。
リアルタイム更新: SSE経由
OpenFeature対応: ロックインを防げる。
IDEのExtension: VSCodeのExtensionを使うと管理画面を開かなくて良い。開発効率がさらに向上。
Edge Flags: Edge DB機能の提供。更新あったデータ一部のみで、全データを送信する必要ない。
Local Bucketing: Edgeよりも更に高速なローカル処理。
詳しくは弊チームメンバー(@gunta85)の記事を参照してください。
https://zenn.dev/gunta/articles/79f77bdc285874
良かったこと
SDKの提供
DevCycleはSDKを提供しており、それらを使用することでFeature Flagの管理を簡単に行うことができます。
AI Workerでは、フロントエンドとバックエンドの両方でDevCycleを活用しており、それぞれに対応したSDKが提供されているため、同一サービスを使用したまま、フロントエンドとバックエンドでFeature Flagを管理することができています。
https://docs.devcycle.com/sdk/client-side-sdks/javascript/
https://docs.devcycle.com/sdk/server-side-sdks/node/
開発効率が向上
現在AI Workerはリリース前の段階ですが、認証や権限まわりのスタブと本実装の切り替え等、段階的に動作確認して行きたい場合にDevCycleを使用することで、環境を壊さず機能を追加していくことができています。
export const jwt = (): MiddlewareHandler => {
  return async (c, next) => {

    // devcycleの機能を使用して,JWTの検証の有無を切り替える
    const jwtVerifyEnabled = devcycleClient.variableValue(devcycleUser(), 'jwt-verify', false)

    if (!jwtVerifyEnabled) {
      await next()
    }

    const token = c.req.header('Authorization')
    if (!token?.startsWith(BEARER_PREFIX)) {
      return c.json({ error: 'Token not found or invalid format' }, 401)
    }

    // ...
  }
}
困ったこと
Feature Flagの管理のルール
DevCycleに限った問題ではないですが、メンバー間でのFlagのon/offによる影響の共通認識や、古いFlagの削除タイミングなど、ある程度チーム内でFeature Flagの管理ルールを定めておかないとFeature Flagの管理が難しくなります。
そのため、AI WorkerではFeature Flagとブランチ管理のルール策定等、Feature Flagを活用した開発生産性向上のための取り組みを行っています。

https://site.developerproductivity.dev/2023-state-of-devops-report/
Biome(Linter/Formatter)
BiomeはRust製のLinter/Formatterを提供するライブラリです。
モノレポのフロントエンド、バックエンドのTS環境に対して設定内容を一元管理ができ、かつ、高速なLinter/Formatterを提供してくれるため、AI WorkerではBiomeを採用しています。
良かったこと
設定が簡単
特にlinterですが、eslintのように必要なプラグインを入れて設定を書く必要がなく、"all": trueを設定して全てのルールの適用を行うことができます。
VSCode等のextentionsも用意されており、biomeの設定ファイルを読み込むことで、エディタ上でのリアルタイムなformattingが可能です。
https://biomejs.dev/ja/reference/vscode/
formatterに関してはLefthookを使用して、pre-commit時に自動でlintとformatを行うようにしています。
pre-commit:
  parallel: false
  commands:
    lint:
      glob: "*.{js,ts,cjs,mjs,d.cts,d.mts,jsx,tsx,json,jsonc}"
      run: bun lint:sg
    check:
      glob: "*.{js,ts,cjs,mjs,d.cts,d.mts,jsx,tsx,json,jsonc}"
      run: bun x @biomejs/biome check --apply --no-errors-on-unmatched --files-ignore-unknown=true {staged_files} && git update-index --again
LintやFormatterは変更対象のファイルのみに実行したいため、Leftbookの{staged_files} templateを使用しています。
一方で、Biome自体にもVCSというGit等のバージョン管理システムとの連携を設定できるようになっています。
 "vcs": {
    "enabled": true,
    "clientKind": "git",
    "defaultBranch": "main",
    "useIgnoreFile": true
 }
上記の設定に対して--changedフラグを使用してコマンドを実行することで、defaultBranchに対して変更されたファイルのみに対してLint/Formatを実行することができます。
$ biome format --changed --writeしかしこのコマンドは現状、変更をコミットした後に変更を検知するような挙動になっています。
そのため、コミット前にエラーを吐いて欲しいので、Leftbookの方の機能を使用しています。
Hygen(code generator)
Hygenはコードジェネレーターです。
ejsを使ってテンプレートを自作し、対話形式でコードを生成することができます。
AI Workerのバックエンドでは下記のようにクリーンアーキテクチャをベースとしたディレクトリ構成となっており、internal配下の定型的なコードは全て自動生成できるようにしています。
.
├── cmd
│   └── server
│       └── index.ts
├── internal
│   ├── domain
│   │   ├── model
│   │   │   └── thread.ts
│   │   ├── repository
│   │   │   └── thread.ts
│   ├── infra
│   │   ├── database
│   │   │   ├── repository
│   │   │   │   └── thread.ts
│   │   ├── http
│   │       ├── injector
│   │       │   └── thread.ts
│   │       └── server
│   │           └── thread.ts
│   └── usecase
│       ├── config.ts
│       ├── input
│       │   └── thread.ts
│       ├── output
│       │   └── thread.ts
│       └── thread.ts
├── routes
│   ├── thread.ts
│   └── ....
良かったこと
対話形式のコード生成ができる
Hygenは対話形式でコードを生成することができます。
バックエンドでは現状複雑な設定を行ってはいませんが、promptに対して質問をあらかじめ定義しておくことで、入力値を元にテンプレートからコード生成ができます。
module.exports = {
  prompt: async ({ inquirer }) => {
    const questions = [
      {
        type: 'input',
        name: 'entity',
        message: 'What is the name of the entity?',
      },
    ]

    const entityAnswer = await inquirer.prompt(questions)

    return { ...entityAnswer }
  },
}

生成されたコード
interfaceの定義や、各層の実装のスタブが生成できます。
開発者は生成されたスタブを元に実装を進めることで、実装の一貫性を保つことができます。
// internal/domain/model/task.ts
export class Task {
  // FIXME: implement
  id: string;

  constructor({ id }: { id: string }) {
    this.id = id;
  }
}
// internal/domain/repository/task.ts
import { Result } from "@/core/result";
import { Pagination } from '@/internal/domain/model/pagination'
import { Task } from '@/internal/domain/model/task'
import { DBContext } from '@/internal/infra/database/client'
import { BaseListOptions } from './base'

export interface TasksWithPagination {
  tasks: Task[]
  pagination: Pagination
}

export class ListTaskQuery implements BaseListOptions {
  public limit: number
  public page: number
  public Preload?: boolean
  public ForUpdate?: boolean
  constructor({
    limit,
    page,
    Preload,
    ForUpdate,
  }: {
    limit: number
    page: number
    Preload?: boolean
    ForUpdate?: boolean
  }) {
    this.limit = limit
    this.page = page
    this.Preload = Preload
    this.ForUpdate = ForUpdate
  }
}

export class GetTaskQuery {
  public id: string
  public Preload?: boolean
  public ForUpdate?: boolean
  constructor({
    id,
    Preload,
    ForUpdate,
  }: {
    id: string
    Preload?: boolean
    ForUpdate?: boolean
  }) {
    this.id = id
    this.Preload = Preload
    this.ForUpdate = ForUpdate
  }
}

export interface ITaskRepository {
  create(ctx: DBContext, task: Task): Promise>;
  getById(ctx: DBContext, query: GetTaskQuery): Promise>;
  update(ctx: DBContext, task: Task): Promise>;
  delete(ctx: DBContext, id: string): Promise>;
  getAll(ctx: DBContext, query: ListTaskQuery): Promise>;
}
// internal/infra/database/repository/task.ts
import { AppError, StatusCode } from '@/core/error'
import { Result } from '@/core/result'
import { Task } from '@/internal/domain/model/task'
import {
  ITaskRepository,
  ListTaskQuery,
  GetTaskQuery,
  TasksWithPagination
} from '@/internal/domain/repository/task'
import { DBContext } from '@/internal/infra/database/client'
import { InsertTask, TaskTable } from '@/schema/db/tenant.schema'
import { count, eq } from 'drizzle-orm'

export class TaskRepository implements ITaskRepository {
  async create(ctx: DBContext, task: Task): Promise> {
    const { db } = ctx
    const dbTask: InsertTask = { ...task };
    const result = await db.insert(TaskTable).values(dbTask).returning().execute();
    const res = result.at(0)
    if (!res) {
      return Result.fail(new AppError(StatusCode.INTERNAL_SERVER_ERROR, 'Failed to create Team'))
    }
    return Result.ok(new Task({ id: res.id, /* other properties */ }))
  }

  async getById(ctx: DBContext, getQuery: GetTaskQuery): Promise> {
    const { db } = ctx
    const result = await db.select().from(TaskTable).where(eq(TaskTable.id, getQuery.id)).execute()
    const res = result.at(0)
    if (!res) {
      return Result.fail(new AppError(StatusCode.INTERNAL_SERVER_ERROR, 'Failed to create Team'))
    }

    return Result.ok(new Task({ id: res.id, /* other properties */ }))
  }

  async update(ctx: DBContext, task: Task): Promise> {
    const { db } = ctx
    const result = await db.update(TaskTable).set({ ...task }).where(eq(TaskTable.id, task.id)).returning().execute();
    const res = result.at(0)
    if (!res) {
      return Result.fail(new AppError(StatusCode.INTERNAL_SERVER_ERROR, 'Failed to update Team'))
    }
    return Result.ok(new Task({ id: res.id, /* other properties */ }))
  }

  async delete(ctx: DBContext, id: string): Promise> {
    const { db } = ctx
    const result = await db.delete(TaskTable).where(eq(TaskTable.id, id)).returning().execute();
    const res = result.at(0)
    if (!res) {
      return Result.fail(new AppError(StatusCode.INTERNAL_SERVER_ERROR, 'Failed to update Team'))
    }
    return Result.ok(new Task({ id: res.id, /* other properties */ }))
  }

  async getAll(ctx: DBContext, listQuery: ListTaskQuery): Promise> {
    const { db } = ctx
    const query = db.select().from(TaskTable)
    if (listQuery.limit && listQuery.page > 0) {
      query.limit(listQuery.limit)
      query.offset(listQuery.limit * (listQuery.page - 1))
    }
    const result = await query.execute();
    const total = await db.select({ value: count() }).from(TaskTable).execute();
    const totalVal = total.at(0)?.value || 0;
    const ar = result.map((t) => new Task({ id: t.id, /* other properties */ }));
    return Result.ok({
      tasks: ar,
      pagination: {
        currentPage: listQuery.page,
        prevPage: listQuery.page - 1,
        nextPage: listQuery.page + 1,
        totalPage: Math.ceil(totalVal / listQuery.limit),
        totalCount: totalVal,
        hasNext: listQuery.page < Math.ceil(totalVal / listQuery.limit),
      },
    });
  }
}
// internal/infra/http/injector/task.ts
import { DBClient } from '@/internal/infra/database/client';
import { TaskRepository } from '@/internal/infra/database/repository/task';
import { TransactionManager } from '@/internal/infra/database/transaction';
import { TaskInteractor } from '@/internal/usecase/task';
import { TaskHandler } from '@/internal/infra/http/server/task';

export class TaskInjector {
  private txManager: TransactionManager = new TransactionManager(DBClient.instance);
  private taskRepository = new TaskRepository();
  private taskUsecase = new TaskInteractor(this.txManager, this.taskRepository);

  get handler(): TaskHandler {
    return new TaskHandler(this.taskUsecase);
  }
}
// internal/infra/http/server/task.ts
import {
  CreateTask,
  DeleteTask,
  GetTask,
  UpdateTask,
  ListTasks,
} from '@/internal/usecase/input/task'
import { Context, TypedResponse } from 'hono'
import { ErrorResponse } from '@/schema/shared'
import {
  TaskRequestSchema,
  TaskResponseSchema,
  TaskResponse,
  TasksResponse
} from '@/schema/shared';
import {
  TaskInteractor,
} from '@/internal/usecase/task';

export type ITaskHandler = {
  create: (c: Context) => Promise>,
  get: (c: Context) => Promise>,
  list: (c: Context) => Promise>,
  update: (c: Context) => Promise>,
  delete: (c: Context) => Promise>
}

export class TaskHandler implements ITaskHandler {
  private taskUsecase: TaskInteractor;

  constructor(taskUsecase: TaskInteractor) {
    this.taskUsecase = taskUsecase;
  }

  async create(c: Context): Promise> {
    // Request parsing and validation
    const validationResult = TaskRequestSchema.safeParse(c.req.json());
    if (!validationResult.success) {
      const errorResponse: ErrorResponse = {
        message: JSON.stringify(validationResult.error.flatten()),
      }
      return c.json(errorResponse, 400)
    }

    // Create input for usecase
    const input: CreateTask = {
      tenantId: c.get('tenantId'),
    }
    const result = await this.taskUsecase.create(input);

    if (!result.isSuccess) {
      const errorResponse: ErrorResponse = { message: result.getError().message }
      return c.json(errorResponse, result.getError().code);
    }

    return c.json(TaskResponseSchema.parse(result.getValue()), 200);
  }

  async get(c: Context): Promise> {
    // FIXME: Request parsing and validation
    const validationParamResult = TaskRequestParamSchema.safeParse(c.req.param())
    if (!validationParamResult.success) {
      const errorResponse: ErrorResponse = {
        message: JSON.stringify(validationParamResult.error.flatten()),
      }
      return c.json(errorResponse, 400)
    }

    // Create input for usecase
    const input: GetTask = {
      tenantId: c.get('tenantId'),
    };
    const result = await this.taskUsecase.get(input);

    if (!result.isSuccess) {
      const errorResponse: ErrorResponse = { message: result.getError().message }
      return c.json(errorResponse, result.getError().code);
    }

    return c.json(TaskResponseSchema.parse(result.getValue()), 200);
  }

  async list(c: Context): Promise> {
    const validationParamResult = PaginationQuerySchema.safeParse(c.req.query())
    if (!validationParamResult.success) {
      const errorResponse: ErrorResponse = {
        message: JSON.stringify(validationParamResult.error.flatten()),
      }
      return c.json(errorResponse, 400)
    }
    const input: ListTasks = {
      tenantId: c.get('tenantId'),
      limit: validationParamResult.data.limit,
      page: validationParamResult.data.page,
    }
    const result = await this.taskUsecase.list(input);
    if (!result.isSuccess) {
      const errorResponse: ErrorResponse = {
        message: result.getError().message,
      }
      return c.json(errorResponse, result.getError().code)
    }

    const t = result.getValue()
    const tasksResponse: TasksResponse = {
      tasks: t.tasks.map((t) => TaskResponseSchema.parse(t)),
      pagination: {
        current_page: t.pagination.currentPage,
        total_page: t.pagination.totalPage,
        total_count: t.pagination.totalCount,
        has_next: t.pagination.hasNext,
        prev_page: t.pagination.prevPage,
        next_page: t.pagination.nextPage,
      },
    }
    return c.json(tasksResponse, 200)
  }

  async update(c: Context): Promise> {
    // Request parsing and validation
    const validationResult = TaskRequestSchema.safeParse(c.req.json());
    if (!validationResult.success) {
      const errorResponse: ErrorResponse = {
        message: JSON.stringify(validationResult.error.flatten()),
      }
      return c.json(errorResponse, 400)
    }

    const validationParamResult = TaskRequestParamSchema.safeParse(c.req.param())
    if (!validationParamResult.success) {
      const errorResponse: ErrorResponse = {
        message: JSON.stringify(validationParamResult.error.flatten()),
      }
      return c.json(errorResponse, 400)
    }

    // Create input for usecase
    const input: UpdateTask = {
      tenantId: c.get('tenantId'),
    };
    const result = await this.taskUsecase.update(input);

    if (!result.isSuccess) {
      const errorResponse: ErrorResponse = { message: result.getError().message }
      return c.json(errorResponse, result.getError().code);
    }

    return c.json(TaskResponseSchema.parse(result.getValue()), 200);
  }

  async delete(c: Context): Promise> {
    // FIXME: Request parsing and validation
    const validationParamResult = TaskRequestParamSchema.safeParse(c.req.param())
    if (!validationParamResult.success) {
      const errorResponse: ErrorResponse = {
        message: JSON.stringify(validationParamResult.error.flatten()),
      }
      return c.json(errorResponse, 400)
    }
    // Create input for usecase
    const input: DeleteTask = {
      tenantId: c.get('tenantId'),
      id: validationParamResult.data.team_id,
    }
    const result = await this.taskUsecase.delete(input);

    if (!result.isSuccess) {
      const errorResponse: ErrorResponse = { message: result.getError().message }
      return c.json(errorResponse, result.getError().code);
    }

    return c.json({ message: 'success' }, 200);
  }
}
// internal/usecase/input/task.ts
export type GetTask = {
  tenantId: string
  id: string
}

export type ListTasks = {
  tenantId: string
  limit: number
  page: number
}

export type UpdateTask = {
  tenantId: string
  id: string
  // TODO: Add other fields that are required for updating a Task
}

export type DeleteTask = {
  tenantId: string
  id: string
}

export type CreateTask = {
  tenantId: string
  // TODO: Add other fields that are required for creating a new Task
}
// internal/usecase/output/task.ts
import { Pagination } from '@/internal/domain/model/pagination'
import { Task } from '@/internal/domain/model/task'

export type ListTasks = {
  tasks: Task[]
  pagination: Pagination
}
// internal/usecase/task.ts
import { Result } from '@/core/result'
import { Task } from '@/internal/domain/model/task'
import { GetTaskQuery, ITaskRepository, ListTaskQuery } from '@/internal/domain/repository/task'
import { ITransactionManager } from '@/internal/domain/repository/transaction'
import { CreateTask, GetTask, ListTasks, UpdateTask, DeleteTask } from './input'
import { ListTasks as OListTasks } from './output'

export type ITaskInteractor = {
  create(param: CreateTask): Promise>
  get(param: GetTask): Promise>
  list(param: ListTasks): Promise>
  update(param: UpdateTask): Promise>
  delete(param: DeleteTask): Promise>
}

export class TaskInteractor implements ITaskInteractor {
  private transactionManager: ITransactionManager
  private taskRepository: ITaskRepository

  constructor(transactionManager: ITransactionManager, taskRepository: ITaskRepository) {
    this.transactionManager = transactionManager
    this.taskRepository = taskRepository
  }

  async create(input: CreateTask): Promise> {
    return this.transactionManager.withTransaction(input.tenantId, async (ctx) => {
      // TODO: Add logic to create a new Task
      const repoResult = await this.taskRepository.create(ctx, new Task(...));
      return repoResult
    })
  }

  async get(input: GetTask): Promise> {
    return this.transactionManager.withTransaction(input.tenantId, async (ctx) => {
      const getQuery = new GetTaskQuery({
        id: input.id,
      })
      const repoResult = await this.taskRepository.getById(ctx, getQuery)
      return repoResult
    })
  }

  async list(input: ListTasks): Promise> {
    return this.transactionManager.withTransaction(input.tenantId, async (ctx) => {
      // TODO: Add logic to list Tasks
      const listQuery = new ListTaskQuery({
        userId: input.userId,
        limit: input.limit,
        page: input.page,
      })
      const repoResult = await this.taskRepository.getAll(ctx, listQuery);
      return Result.ok({ tasks: repoResult.getValue().tasks, pagination: repoResult.getValue().pagination });
    })
  }

  async update(input: UpdateTask): Promise> {
    return this.transactionManager.withTransaction(input.tenantId, async (ctx) => {
      const getQuery = new GetTaskQuery({
        id: input.id,
      })
      const getRepoResult = await this.taskRepository.getById(ctx, getQuery)
      if (!getRepoResult.isSuccess) {
        return Result.fail(getRepoResult.getError())
      }
      const updatedTask = getRepoResult.getValue()
      // TODO: Update the Task as needed
      const repoResult = await this.taskRepository.update(ctx, updatedTask)
      return repoResult
    })
  }

  async delete(input: DeleteTask): Promise> {
    return this.transactionManager.withTransaction(input.tenantId, async (ctx) => {
      const repoResult = await this.taskRepository.delete(ctx, input.id)
      return repoResult
    })
  }
}
困ったこと
テンプレートのメンテナンスが必要
プロパティの追加や命名修正等に伴うテンプレートのメンテナンスが必要です。
修正が発生した段階で後回しにせずに細かくメンテナンスを行うことが重要です。
テンプレートファイル
ejsのため動的な値の埋め込み等に対応していますが、埋め込んだ結果、かなり可読性が悪くなってしまうのでIDEのサポートやCopilot等のサポートは必須です。
---
to: internal/usecase/<%= h.inflection.underscore(entity.toLowerCase()) %>.ts
---
import { Result } from '@/core/result'
import { <%= h.inflection.classify(entity) %> } from '@/internal/domain/model/<%= h.inflection.underscore(entity.toLowerCase()) %>'
import { Get<%= h.inflection.classify(entity) %>Query, I<%= h.inflection.classify(entity) %>Repository, List<%= h.inflection.classify(entity) %>Query } from '@/internal/domain/repository/<%= h.inflection.underscore(entity.toLowerCase()) %>'
import { ITransactionManager } from '@/internal/domain/repository/transaction'
import { Create<%= h.inflection.classify(entity) %>, Get<%= h.inflection.classify(entity) %>, List<%= h.inflection.classify(entity) %>s, Update<%= h.inflection.classify(entity) %>, Delete<%= h.inflection.classify(entity) %> } from './input'
import { List<%= h.inflection.classify(entity) %>s as OList<%= h.inflection.classify(entity) %>s } from './output'

export type I<%= h.inflection.classify(entity) %>Interactor = {
  create(param: Create<%= h.inflection.classify(entity) %>): Promise>>
  get(param: Get<%= h.inflection.classify(entity) %>): Promise>>
  list(param: List<%= h.inflection.classify(entity) %>s): Promises>>
  update(param: Update<%= h.inflection.classify(entity) %>): Promise>>
  delete(param: Delete<%= h.inflection.classify(entity) %>): Promise>>
}

export class <%= h.inflection.classify(entity) %>Interactor implements I<%= h.inflection.classify(entity) %>Interactor {
  private transactionManager: ITransactionManager
  private <%= h.inflection.camelize(entity.toLowerCase(), true) %>Repository: I<%= h.inflection.classify(entity) %>Repository

  constructor(transactionManager: ITransactionManager, <%= h.inflection.camelize(entity.toLowerCase(), true) %>Repository: I<%= h.inflection.classify(entity) %>Repository) {
    this.transactionManager = transactionManager
    this.<%= h.inflection.camelize(entity.toLowerCase(), true) %>Repository = <%= h.inflection.camelize(entity.toLowerCase(), true) %>Repository
  }

  async create(input: Create<%= h.inflection.classify(entity) %>): Promise>> {
    return this.transactionManager.withTransaction(input.tenantId, async (ctx) => {
      // TODO: Add logic to create a new <%= h.inflection.classify(entity) %>
      const repoResult = await this.<%= h.inflection.camelize(entity.toLowerCase(), true) %>Repository.create(ctx, new <%= h.inflection.classify(entity) %>(...));
      return repoResult
    })
  }

  async get(input: Get<%= h.inflection.classify(entity) %>): Promise>> {
    return this.transactionManager.withTransaction(input.tenantId, async (ctx) => {
      const getQuery = new Get<%= h.inflection.classify(entity) %>Query({
        id: input.id,
      })
      const repoResult = await this.<%= h.inflection.camelize(entity.toLowerCase(), true) %>Repository.getById(ctx, getQuery)
      return repoResult
    })
  }

  async list(input: List<%= h.inflection.classify(entity) %>s): Promises>> {
    return this.transactionManager.withTransaction(input.tenantId, async (ctx) => {
      // TODO: Add logic to list <%= h.inflection.pluralize(entity) %>
      const listQuery = new List<%= h.inflection.classify(entity) %>Query({
        userId: input.userId,
        limit: input.limit,
        page: input.page,
      })
      const repoResult = await this.<%= h.inflection.camelize(entity.toLowerCase(), true) %>Repository.getAll(ctx, listQuery);
      return Result.ok({ <%= h.inflection.pluralize(entity.toLowerCase()) %>: repoResult.getValue().<%= h.inflection.pluralize(entity.toLowerCase()) %>, pagination: repoResult.getValue().pagination });
    })
  }

  async update(input: Update<%= h.inflection.classify(entity) %>): Promise>> {
    return this.transactionManager.withTransaction(input.tenantId, async (ctx) => {
      const getQuery = new Get<%= h.inflection.classify(entity) %>Query({
        id: input.id,
      })
      const getRepoResult = await this.<%= h.inflection.camelize(entity.toLowerCase(), true) %>Repository.getById(ctx, getQuery)
      if (!getRepoResult.isSuccess) {
        return Result.fail(getRepoResult.getError())
      }
      const updated<%= h.inflection.classify(entity) %> = getRepoResult.getValue()
      // TODO: Update the <%= h.inflection.classify(entity) %> as needed
      const repoResult = await this.<%= h.inflection.camelize(entity.toLowerCase(), true) %>Repository.update(ctx, updated<%= h.inflection.classify(entity) %>)
      return repoResult
    })
  }

  async delete(input: Delete<%= h.inflection.classify(entity) %>): Promise>> {
    return this.transactionManager.withTransaction(input.tenantId, async (ctx) => {
      const repoResult = await this.<%= h.inflection.camelize(entity.toLowerCase(), true) %>Repository.delete(ctx, input.id)
      return repoResult
    })
  }
}
既存ファイルの部分的な更新が難しい
Hygenはファイルの上書きを行うため、既存のファイルの一部のみを更新することが難しいです。
そのため既存のファイルの一部のみを更新する場合は、手動での修正が必要です。
試してはいませんが、`hygen`を`nx`のカスタムgeneratorとして使用しつつ、`nx`のファイルの編集機能を使用すれば、同じ`ejs`を使用しながら既存ファイルの一部のみを更新することができるかもしれません。

https://nx.dev/extending-nx/recipes/modifying-files
技術選定以外の取り組み
ここまでで、AI Workerで採用している技術に関して紹介しました。
しかし、弊チームでは新しいものを取り入れるだけでなく、どのようにメンバーに浸透させるか、どのようにメンバーが使いやすい環境を作るか等、技術以外の開発環境の向上への取り組みも行っています。
代表的な取り組みとしては以下があります。
- ADRの導入
- 技術共有会の開催
ADRの導入
ADRはArchitecture Decision Recordの略で、アーキテクチャの意思決定を記録するためのフォーマットです。
AI Workerでは日々の開発のルールや機能追加、ライブラリ等の選定過程の結果を残し、チームで後から振り返られるようにしています。
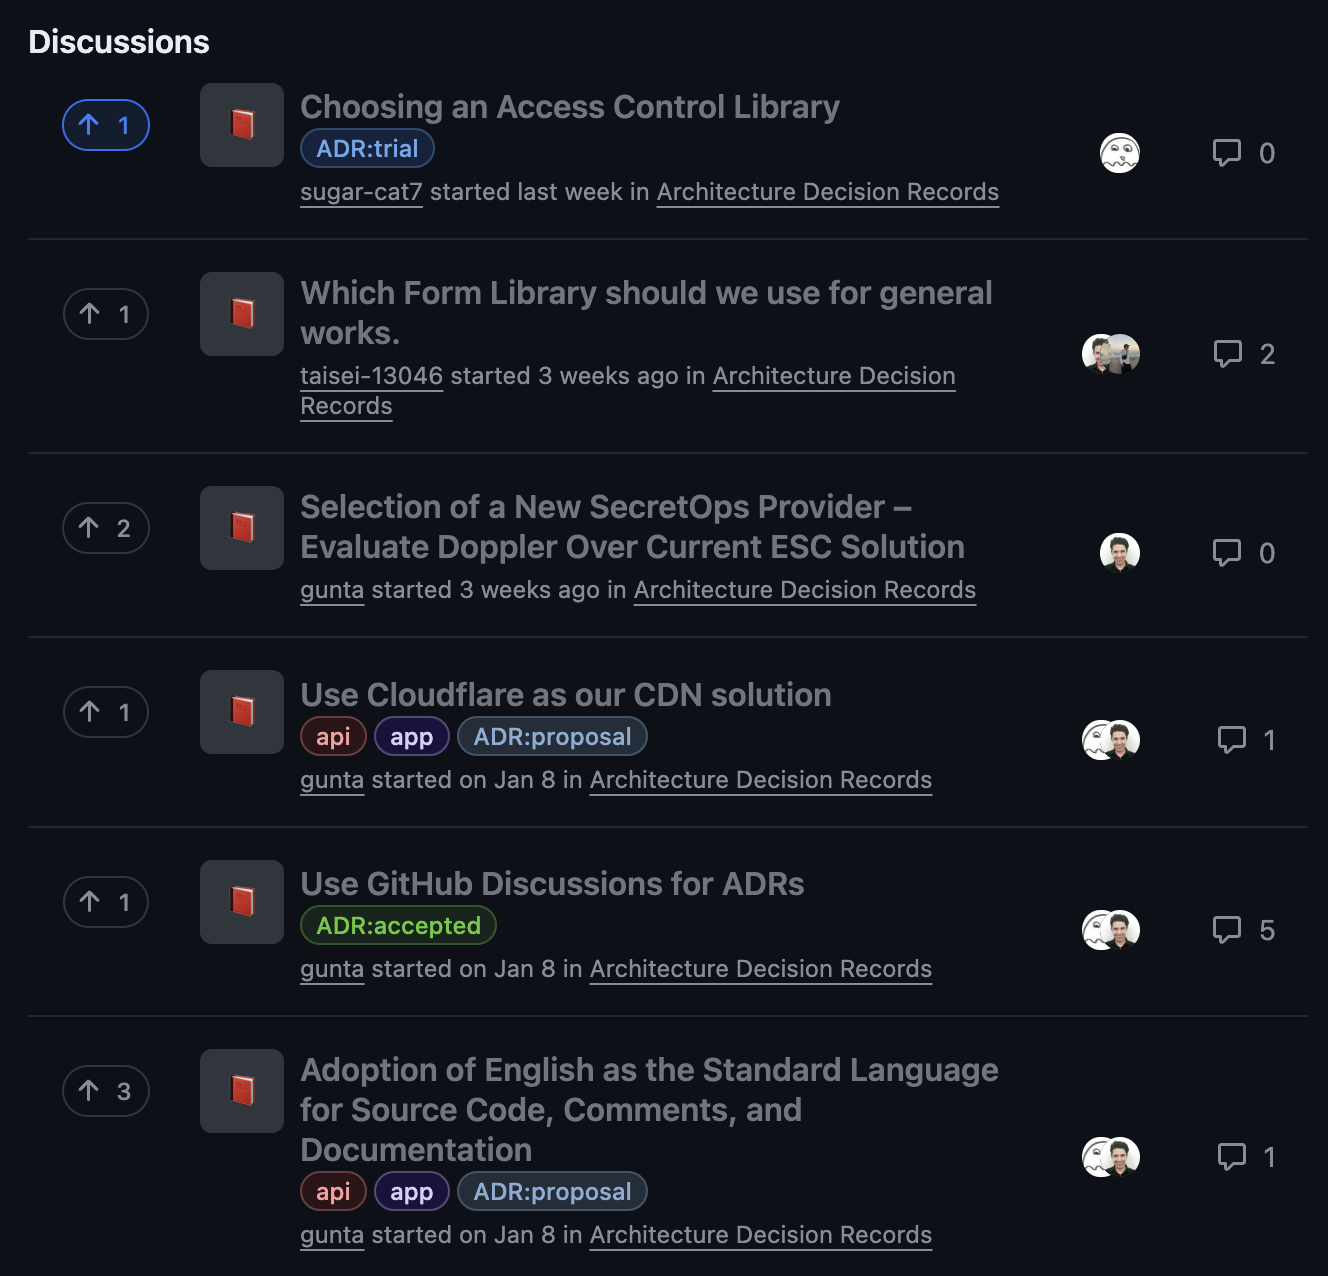
運用は形骸化しないように、Github Discussionsを使用してカジュアルにADRを残し議論ができるようにしています。技術共有会の開催
AIShiftでは毎週フロントエンド、およびバックエンドで技術共有会を開催しています。
AIShiftは、AI Worker以外にもChat BotやVoice Botの開発運用を行うチームもあり、それぞれのチーム内で技術的な知見が閉じてしまわないように、横軸施策としての勉強会を行っています。
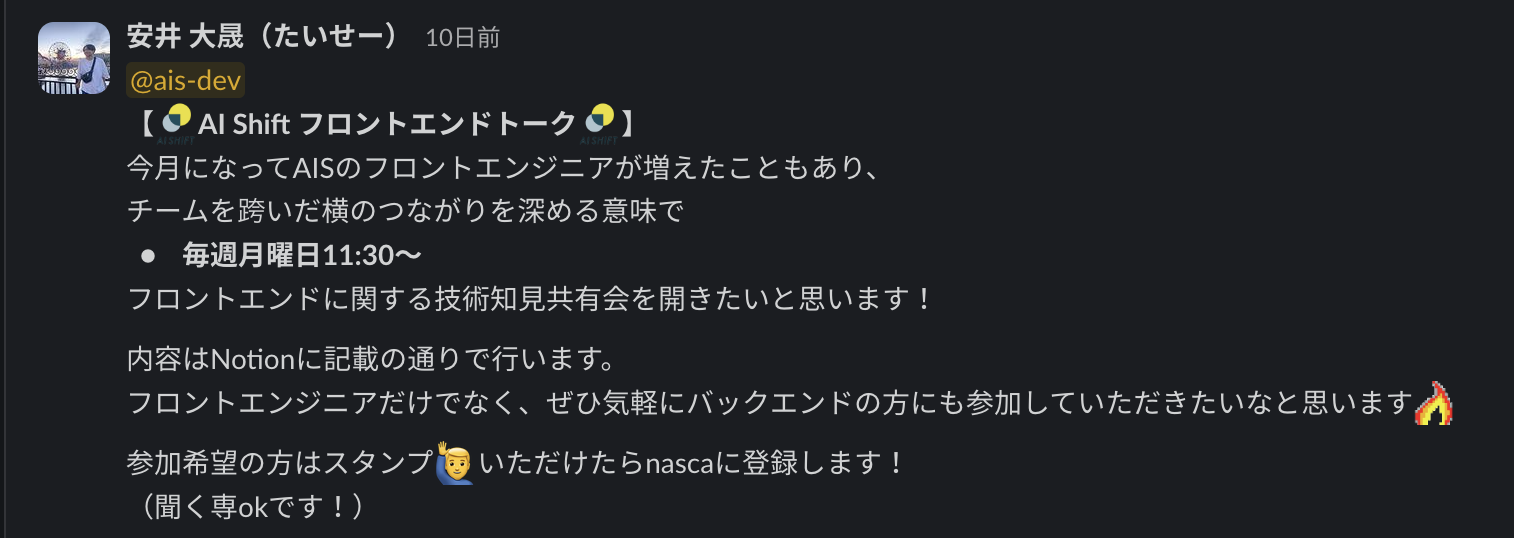
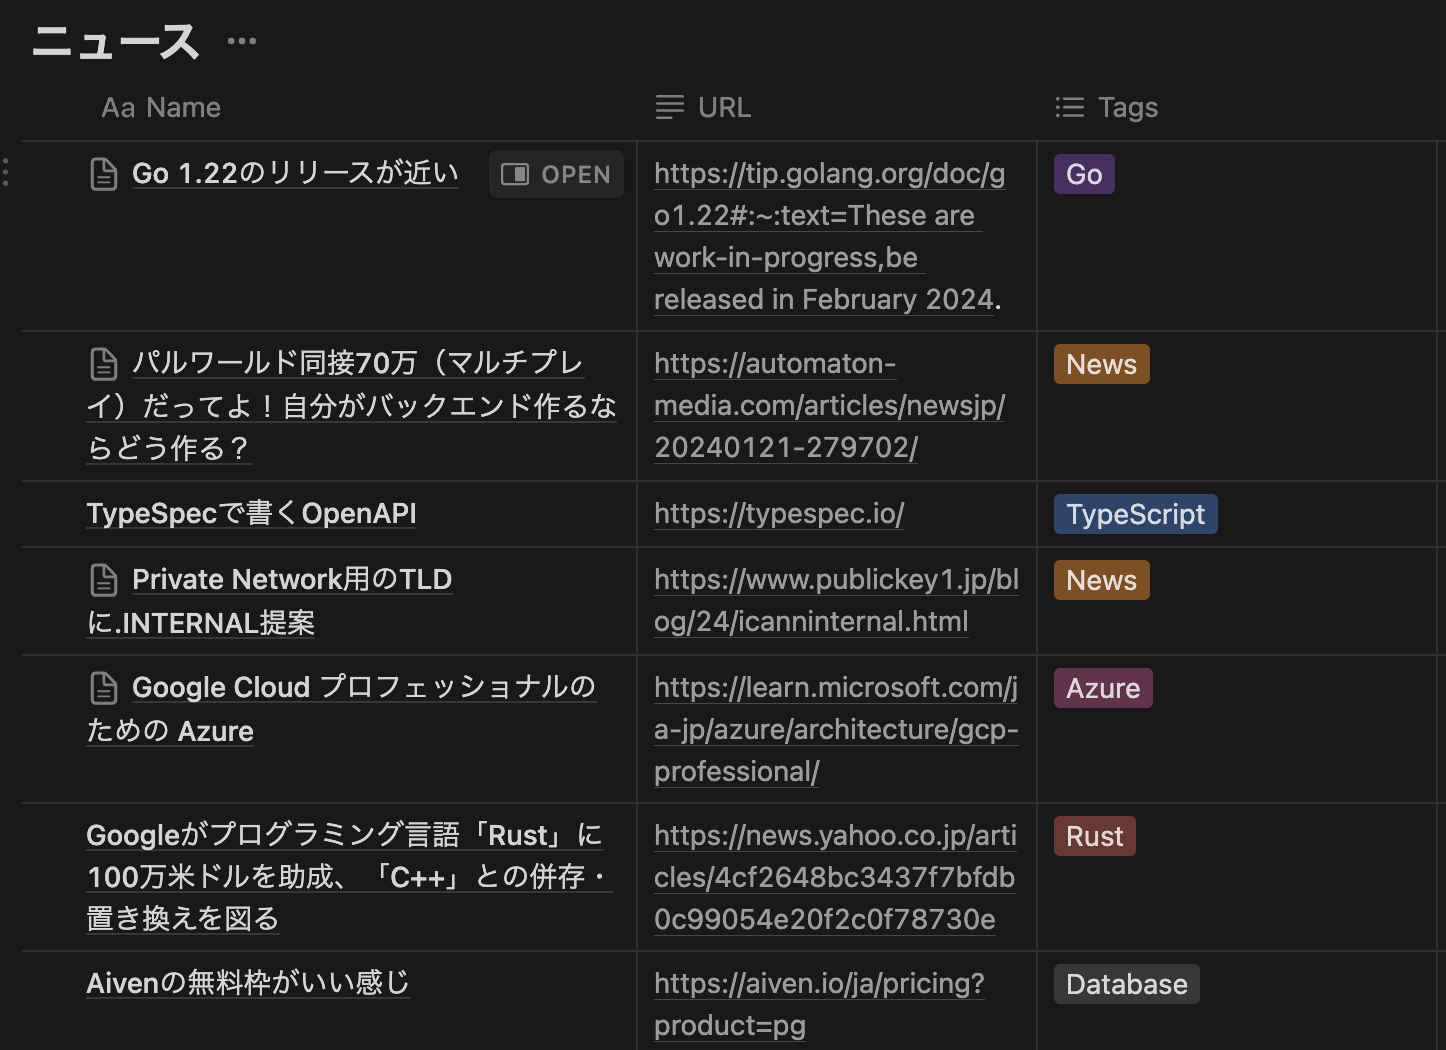
AI Workerフロントエンド(@ytaisei_)が運営を行ってくれており、各プロダクトごとに採用している技術の共有や、話題の技術のキャッチアップをざっくばらんに行っています。
まとめ
この記事ではAI Workerで採用している技術とチーム内での取り組みについて紹介しました。
まだチーム自体は発足し3ヶ月程度で、できていないことも多いですが、日々新しい技術と向き合いながら検証を行い、プロダクトに取り入れています。
本記事では各ライブラリの表面的な部分のみしか触れていませんが、各ライブラリの詳細やインフラ面については随時記事にして投稿していきたいと思います。
最後に
AI Shiftではエンジニアの採用に力を入れています!
少しでも興味を持っていただけましたら、カジュアル面談でお話しませんか?
(オンライン・19時以降の面談も可能です!)
【面談フォームはこちら】
https://hrmos.co/pages/cyberagent-group/jobs/1826557091831955459


